 (925) 293-3313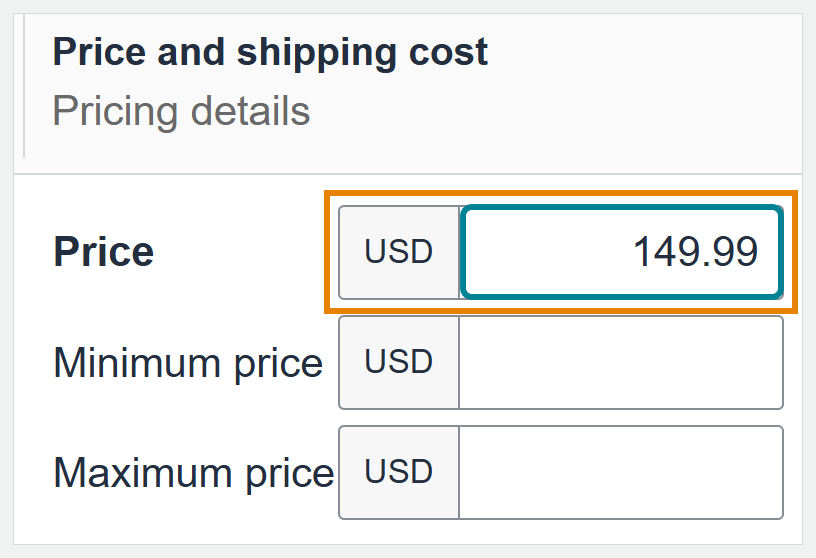
Typing a new price into Seller Central takes seconds. The part that goes wrong is confirming it. The row saves, but the product page still shows the old price, and you cannot tell why: Amazon may just be slow, a sale may be running underneath, or you may have edited the wrong row.
The short version: open the Manage All Inventory page, find the product, type the new number into its Price box, and click Save all. Amazon’s help says most changes appear on Amazon within 5 minutes. Most of this guide is about the checking that comes after.
Screenshots taken in Seller Central on September 4, 5 and 24, 2026. This guide covers the price of a product you already sell. It does not cover creating a listing, running a sale, or bulk repricing tools.
What you need before you change a price in Seller Central
- A Seller Central login that can edit listings. If the Price box will not accept typing, ask the account owner whether your user has that permission.
- A way to recognize the right product in the list. Every row shows the product title, its ASIN (Amazon’s own ID for the product) and its SKU (the stock code you gave the product when you listed it). Searching by a word from the title works best, as Step 2 explains.
- The new price, and a quick check that it still covers your fees. The Estimated fees column on each row shows Amazon’s fee estimate per unit sold. On the row used in this guide it read $10.65 in total.
Step 1: Open Manage All Inventory
Click the menu button (three lines) in the top-left corner of any Seller Central page, then click Inventory, then Manage All Inventory.
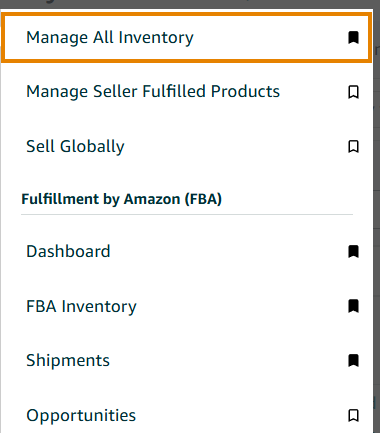
You are in the right place when the page title reads Manage All Inventory and you see four tabs: All listings, Complete drafts, Activate listings and Enhance listings.
The left menu also has a Pricing section of its own, one item below Inventory. This guide does not open it. Everything here happens on the inventory row, where the price sits beside the stock and fee columns you want to check it against.
Amazon has been moving sellers to a new Seller Central layout. If your menu does not match these screenshots, type Manage All Inventory into the search bar at the top of the page; it opens the same list.
Step 2: Find the product
Type a word from the product title into the search box under the tabs and click the magnifying glass. Seller Central shows only the rows that contain that word.
Search by a title word. When we typed an exact SKU into this box, Seller Central opened a separate page for that SKU, called SKU Central, instead of filtering the list. Searching by title keeps you on the page that has the Price box.
Before you change anything, check the SKU under the title. Products in a variation family (sizes, colors, packs) have near-identical titles, and the SKU is how you tell them apart.
Step 3: Click into the Price box
In the Price and shipping cost column, each row has a Price box with USD in front of it. Click into it.
Under it are Minimum price and Maximum price. They are optional price limits you can set for each listing. Leave them empty unless you already use them.
The picture at the top of this page is a listing with no sale running: a plain Price box holding 149.99. The screenshot below shows a listing with a sale running, and two things are different. A tag icon sits next to the word Price, and a Sale price line appears under the boxes, above the Featured offer and Business price lines, which show with or without a sale. With the Price box selected, a note above it reads “SKU is running a sale”.
On both listings the Price box holds the regular price, and that is the number you edit.
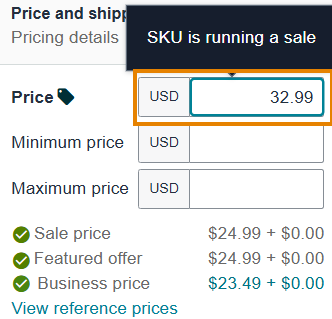
Business price is the separate rate for Amazon Business buyers ($23.49 on this row). It is not edited in the Price box. On this row the $23.49 figure is itself the link to change it; a listing without a business price shows Set instead.
FBA (Fulfillment by Amazon) rows have no quantity box, because Amazon counts the units in its warehouses. If you ship orders yourself, Amazon’s help says the row also has a quantity field that saves the same way.
Step 4: Type the new price
Select the old number and type the new one in dollars and cents, with no currency sign. The sale row above shows 32.99, so changing it to 31.49 means selecting 32.99 and typing 31.49. Then click anywhere else on the page to finish the edit.
Step 5: Click Save all
A dark bar appears at the bottom of the screen: 1 SKU edited, with a Cancel button and a Save all button. Click Save all. Nothing is sent to Amazon until you do, and Cancel throws the edit away.

Step 6: Confirm the new price is live on Amazon
We canceled the edit shown in these screenshots because the listing was live. So this step lists what to check, not a save we watched.
- Refresh Manage All Inventory and read the Price box on the row. It should show your new number, 31.49 in this example, and not the 32.99 that was there before.
- Give it time: up to 6 hours, though most changes show much sooner.
- Open the product’s page on Amazon and check the price a customer sees.
- If other sellers offer the same product, the price shown first may belong to one of them. Check the seller name next to the price. If it is not yours, find the link to other sellers’ offers on that page and look for your own.
- Check that the Listing status column still reads Active. If it changed, see If the new price does not show.
Why the product page can still show the old price
A sale can change what a retail customer sees. In the Step 3 screenshot, the Price box holds 32.99, but the Sale price line reads $24.99.
The Featured offer line reads $24.99 too. The Featured offer (Amazon’s help also calls it the Buy Box) is the offer shown first on the product page, so $24.99 is the price a retail buyer sees first when this offer holds it. Another seller can hold the Featured offer instead, and Amazon Business buyers have their own rate, the Business price.
So if you save a new regular price while a sale runs, the product page can keep showing the sale price. In that case the save worked; for a retail buyer viewing your offer, the sale price can still be the price shown.
Another route: the Edit listing form
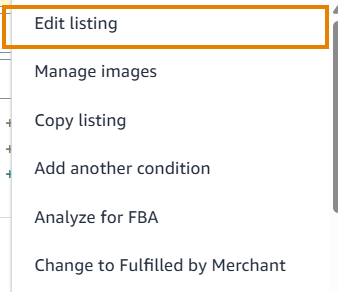
If you would rather use a full form, click the three-dot menu at the right end of the row and choose Edit listing. Amazon’s help calls it Edit, and says the form holds the price under Offer details and ends with a Save and finish button.
If the new price does not show
- If it has been less than 6 hours, wait and refresh.
- Read the Listing status column. An Out of stock listing cannot be bought, whatever its price. Under that status, Seller Central shows a next step, such as Replenish inventory.
- Inactive means the offer is not live. The reason sits under the word: a price Amazon flagged as a possible error is one cause, a listing you closed yourself is another. Click the link under the status and follow what Amazon says for that listing.
- If it is a pricing error, our walkthrough on how to fix pricing errors on Amazon Seller Central covers the rest.
- Look at Minimum price and Maximum price, the two boxes under Price on the same row. If you set those limits yourself, check the new price sits between them. Adjust the limit or the price, then save again.
- Check that you matched the SKU, not just the title, if the product has variations.
- Open the product page in a private browser window. Your browser may be showing you an older copy of the page.
What to do next
When you have more than a handful of prices to change, Amazon’s bulk tools are the next thing to learn. Until then, change one product first and confirm the live price before you touch the rest. The five minutes that costs you is the difference between one wrong price and forty.
Frequently asked questions
How long does an Amazon price change take to show?
Amazon’s help says most changes appear within 5 minutes, and some take up to 6 hours. If the product page still shows the old number after that, check the Listing status column and reload the page in a private window before assuming the edit failed.
What is the difference between Price and Sale price on the row?
Price is the regular price you set, and the number you edit in this guide. Sale price is what retail buyers pay while a sale runs, and it has its own line under the boxes.
Why does the product page show a different price from my Price box?
Usually because a sale is running, or because another seller’s offer is shown first on a product page that several sellers share. The section on why the product page can still show the old price walks through the sale case.
Sources: Amazon Seller Central Help, “Use Manage Inventory” (help ID 551: menu names and the 5-minute and 6-hour timings) and “Edit a listing” (Offer details and Save and finish), both login-only, read September 3, 2026. The screenshots are from the live Manage All Inventory page, September 4, 5 and 24, 2026. For Amazon’s public overview of Seller Central, see Amazon’s Seller Central overview on sell.amazon.com.
Written by Josh Hackett for EHP Consulting Group, which manages Seller Central accounts for brands. For an outside read of your pricing, book an Amazon account audit.